How to Organize Fantasy Locations: Hierarchies That Scale
Organize fantasy locations from continent to single room. A D&D world building hierarchy that stays searchable as your campaign grows past 200 entries
By Jon ·
What you'll learn: How to structure locations so any place in your world is findable in under 10 seconds, whether you have 15 entries or 500. Kanka features used: Location entries, Maps, Relations, Tags Time to complete: 20 minutes
Every campaign hits the same wall. You've got 40 locations in a flat list, a player asks "wait, is the Iron Bazaar in Thornmere or Ashenmoor?" and you're panicking, scrolling through entries trying to remember. Both cities have markets, why didn't you give them more detail when you wrote it down!. The problem is that list doesn't encode spatial relationships. You built a filing cabinet when you needed a map of your world's geography.
The fix isn't more notes. It's a location hierarchy that mirrors how your world actually works: continents contain regions, regions contain settlements, settlements contain districts and buildings. When you nest locations inside each other, browsing Thornmere's entry shows you every sub-location at a glance. The structure answers the question before you finish typing.
This tutorial covers the hierarchy depth that handles 95% of campaigns, when to create new locations, and how uploaded maps connect to your entry hierarchy. If you haven't read our hub article on worldbuilding for tabletop RPGs, start there, it introduces the concentric circles model we'll build on here.
How Deep Should Hierarchies Go?
Three to four levels of nesting handle 95% of campaign worlds. More than that creates navigation overhead that costs more than it saves.
Here's what works for most campaigns:
| Level | Example | Location Type |
|---|---|---|
| 1 — Continent/World | The Sunward Reaches | Continent |
| 2 — Region/Province | Thornmere Province | Region |
| 3 — Settlement | Thornmere City | City |
| 4 — District/Building | The Iron Bazaar, Castle Ward, Docks District | Market, Fortress, District |
This structure maps to how players actually think about space. "We're heading to the Iron Bazaar" triggers a mental chain: that's in Thornmere City, in Thornmere Province, somewhere in the Sunward Reaches. The hierarchy encodes that chain so you don't have to remember it.
The exception is dungeon-heavy campaigns. If you're tracking individual rooms in a megadungeon, add a fifth level — but the dungeon itself stays a Location at level 4, with rooms as children. You're still within the guideline.
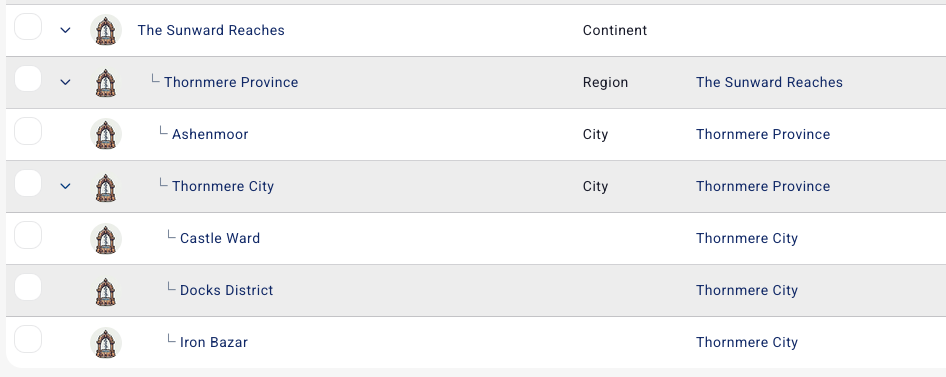
It should now look something like this.
A few things make this hierarchy work harder for you:
Every Location can have a Type — City, Dungeon, Building, Wilderness, Natural Feature. This isn't just labeling. It enables cross-hierarchy filtering: "show me all Dungeons regardless of which region they're in." That filter saves serious time when your world grows past 100 entries.
Create parent Locations before children, even if the parent is just a name with no description yet. A region called "Thornmere Province" with nothing but a name is better than three orphaned cities you'll have to reorganize later.
Use the Nested Layout Toggle during prep to see the full tree structure. Switch to Flatten Layout Toggle during sessions, flat lists are faster to scan when a player catches you off-guard.
Not everything fits a parent-child model, though. Trade routes between Thornmere and Ashenmoor, border disputes, military alliances, these are lateral connections, not hierarchical. Use entry relations for these. Set up a "Trade Route" relation between two cities, a "Border Dispute" between two regions. These cross-references turn static geography into a political and economic web, a living world where the spatial layer connects to everything else.
Parent-child hierarchy handles spatial containment. Relations handle everything else: trade, conflict, alliance.
This section establishes the spatial skeleton of your campaign wiki. But a skeleton is empty without inhabitants. The next question: when do you actually create these locations?
When Do You Add New Locations?
Create a location when players are about to visit it, or when an existing entry references it. Not before.
The concentric circles model from the hub article gives you the timing. Circle 1 locations, the starting settlement and its key buildings, exist before session 1. Circle 2 locations emerge during sessions 2–5 as the party explores outward. Circle 3 locations get created only when an NPC names them or a quest points there.
The discipline is resisting the urge to build every location on your map before session one. A location that players never visit is part of the lore, but not part of your player's world. Worldbuilding is fun, but if you're being a bit utilitarian, don't use too much of your session prep time without producing any play value. A location created in response to player action is guaranteed to be relevant.
A new location needs only three things at creation:
| Field | Why It's Required |
|---|---|
| Name | You can't reference what you can't name |
| Type | Enables filtering across the hierarchy |
| Parent Location | Prevents orphans and places the location in spatial context |
Everything else can wait. Description, population, political affiliations, you can add those when the party approaches or when you're prepping the session that features it.
For locations mentioned in conversation but not yet visited, create a seed entry. You can create a tag called "Status:Seed" so you know it's a placeholder and you can come back to it later to add content. Don't flesh it out until the party is two sessions away. This is how your world grows organically without overwhelming your prep schedule.
Press 'N' or click the Create button to create locations mid-session. Name, Type, Parent, done in under 15 seconds. Then add one @mention linking the new location to whatever spawned it: the NPC who mentioned it, the quest that leads there, the session journal where it first appeared. That single link ensures the location is never disconnected from its narrative origin.
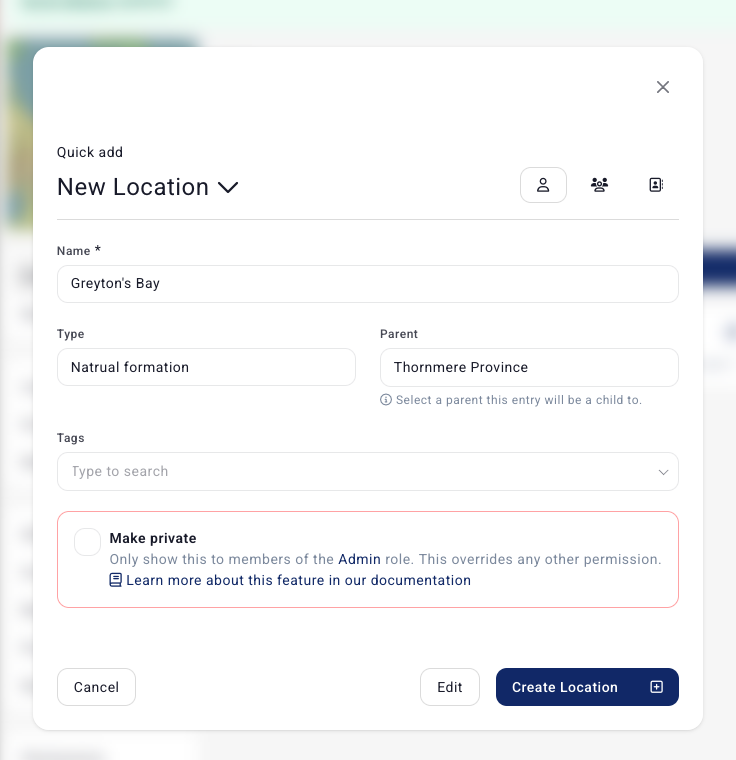
It should now look something like this.
When you write location descriptions, write from the arriving party's perspective. What do they see, hear, smell? This turns your wiki from a dry reference document into something you can read aloud at the table. "The salt wind hits you before you see the harbor" is more useful mid-session than "Thornmere is a coastal trading city."
How Do Maps Fit In?
Maps are the visual layer over your location hierarchy — not a replacement for it. A beautiful map shows where things are. The hierarchy shows what those places contain, who lives there, and how they connect.
Upload maps you've created in any tool: Inkarnate, Wonderdraft, Dungeon Scrawl, or hand-drawn and scanned, directly to Kanka. Then add interactive pins linked to your Location entries. Clicking a pin shows the full location profile: geography and lore unified. Your players see the map; clicking a city pin shows them everything you've made visible about that city.
The two systems complement each other. The map provides spatial intuition: distances, terrain, borders at a glance. The entry hierarchy provides relational depth, who rules there, what factions operate, which quests point to that region. Neither replaces the other.
Here's how to get the most from map integration:
Upload maps at the highest reasonable resolution. Players will zoom in during sessions, and blurry maps break immersion faster than any lore inconsistency.
Use Map Groups to organize pins into logical clusters: "Cities," "Dungeons," "Points of Interest," "Secret Locations." This keeps your map readable as pin count grows.
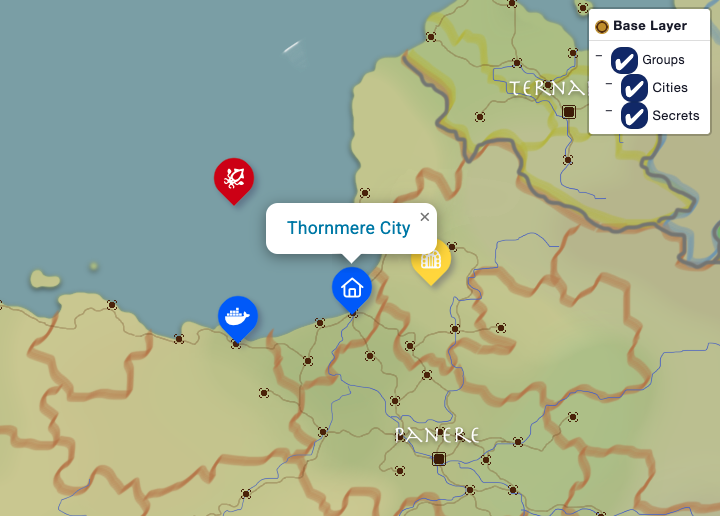
It should now look something like this.
Pin placement is an ongoing activity. Add pins as new locations enter play. Don't try to pin everything on day one, that's the same overbuilding trap we talked about with location entries. Let the map grow alongside the campaign.
For campaigns spanning multiple scales or timelines, use Map Layer hierarchy for multi-scale mapping. Your world map serves as the base layer. Different layers of detail are here to add… layers relevant to any different set of circumstances. Think adding/removing historical borders. They use the base image and adapt it to your time context.
Locations are where your world's geography lives. But they're also where factions operate. Linking Organization entries to their territorial Locations transforms static geography into a political landscape which is exactly what the next article in this series covers.
If you have any questions, join us over on our Discord! We also have more tutorials on our blog.
Related Articles
Stop building worlds you'll never use. Start with one town, expand from play, and let a relational system keep it all connected. Free, no entry limits.
Stop losing NPCs in scattered notes. Link every character to their location, faction, and quest so context surfaces the moment a player asks. Free, any system
Factions should start fights, not just fill lore pages. Link members, territory, and rivalries into a political web your players will actually navigate